2009/10/28

Fishing From Heaven (part I)

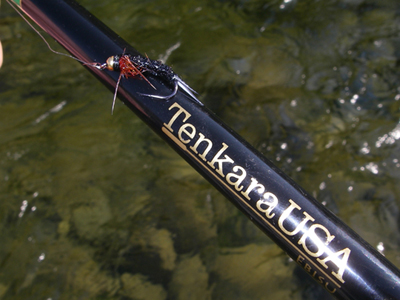
According to at least one internet source, Tenkara translates to "From Heaven". It's a nice sentiment and captures well the elegant simplicity of this style of fishing. With only rod, line, and leader it pares away the need for reels, spools and spare lines. Add a box of flies, a spool of tippet and perhaps a little floatant and you are in business.

In this piece (broken into three parts), I'm going to relate some of my experiences with using the Tenkara rod on the water--specifically casting, presentation and fish handling. Keep in mind that all my observations relate specifically to the Ebisu 6:4 12' rod, although I suspect that there will be a fair degree of carry over between the various Tenkara rods available.

Casting the Tenkara

Casting the Tenkara rod is both like and unlike casting a fly rod. The basic physics behind casting is much the same, in that there is a defined back cast to load the rod and a forward cast to increase the stored energy and propel the line through the air. Where it differs from the fly rod is that the stroke is much shorter than with a fly rod (10/12 as opposed to 10/2 o'clock) and more wrist is used--creating more of a flick in the final delivery. The traditional hand placement is also different, with the index finger laying parallel to the rod and "pointing" toward the tip.

I've tried several lines and tapers since purchasing my 12' (3.7 m) Ebisu model--a furled mono Tenkara line, a clear intermediate poly-tip, a length of level running line (with and without a tapered leader), and finally various sections of tapered fly line in a range of line weights.

I originally ordered rod with the recommended 10' 6" (3.2 m) furled mono line. After a few perfunctory flicks in the backyard, I took the rod to a local stream for an on the water test. My casting strokes were a little awkward at first. I tried the recommended 10/12 o'clock cast but I found the forward stroke didn't really turn the line over well. However, increasing both the speed of the back cast slightly and the pause at the twelve o'clock position helped significantly. If I was able to load the line in the water prior to the back cast as I would on a spey cast, the results were better still. The only casting issue with this line is that the line lacks a measure of stiffness needed to really turn over larger flies--a minor issue because you would rarely end up using this rod for casting chernobyl ants and the like.

The next "line" I tried was assembled using a tapered 5' (1.5 m) clear neutral density Airflo poly-tip, attached to a 6' (1.8 m) section of 8lb Berkley Vanish. I found that the heavy tapered tip was enough to turn over the stiff fluorocarbon section while allowing the rod to load more easily than with the furled line. This configuration worked particularly well for weighted flies over the short casting stroke of the rod. Of the various configurations tried, I found this the most useful for czech nymphing.

Looking for a little extra distance for dry fly and streamer presentations, the third configuration I tried was an 11' length of narrow floating running line looped at either end. I used this alone and in combination with the poly-tip mentioned above. The former configuration worked poorly but the addition of the tip made casting very smooth, loading the rod easily and laying the line out straight and quietly on a few clear streams that I fish. The only drawback was that the extra length made landing fish much more difficult and there was loss of intimacy and feel that is the real benefit of this rod. I suspect a shorter running line in conjunction with the tapered tip would probably give better results and I may try this in future.

The last series of lines tried were taken from traditional fly lines: two 15' (4.5 m) tips from a 5 and 8 wt multi-line set-up and a 15' section cut from a 2wt floating line. As expected the heavy tips went far beyond the limits of what the rod could handle. In both cases I was able to cast these lines, but the results were far from pretty--with rod heavily over-flexed and the delivery both awkward and heavy. The 2wt tapered line proved to be a completely different story. Casting was both effortless and smooth. Dry flies and soft-hackles turned over perfectly and alighted gently on the water. Heavy artillery also fired well with this line including medium sized streamers. However, at 15' the line was too long to control properly particularly with regard to fish handling, and as with the level line/tip combination contributed to a loss of intimacy and feel. Cutting the line first to 13' and finally to 11' (removing sections from the butt end) returned line control and sensitivity.

Summary:

Of the lines tried, the furled tenkara line, polytip and 2wt floating taper all proved adequate for casting with the 12' Ebisu. However, I feel that the 11' two weight tapered fly line was most appropriate for the rod. Sufficiently heavy enough to load the rod easily, this line can be adapted for the widest range of uses--including dry fly, soft hackle and streamer work. I would still give the edge to the polytip line for czech nymphing in deeper flows where the floating taper can interfere with presentation, but overall the floating tip is the most versatile.

Next time I discuss the Tenkara rod it will be with respect to presentation. Until then good fishing everyone (I'm off to look for coho and cutthroat).

Aaron

2009/09/30

2009 Canadian National Fly Fishing Championships

The 2009 Canadian National Fly Fishing Championships were held this past week (September 21st through the 26th) in perhaps one of the most beautiful places on this continent--Fernie BC. Although the event was originally scheduled to be held in William's Lake this year, last minute difficulties necessitated the switch to Fernie and I for one couldn't have been happier because of the chance to fish one of the premier cutthroat rivers in North America. Event organizer, Kevin McIsaac, managed to pull together a very good event given the time available and aside from dropping one of the venues (Loon Lake) from the competition due to a lack of suitable vessels, the event progressed pretty smoothly.

I was one of 45 entrants and came to the competition with Team Mustang, skippered by Wayne Yoshizawa. In addition to Wayne, I was joined by Norm Godding, Randy Paskall, Randy Patton, and our lovely support staff Leslie Godding and Deb Paskall. While all of us had at least some competitive experience under our collective belts (Wayne and Norm were part of the Gold Medal team in the Campbell River Nationals) we were a relatively "young" team in terms of the overall field of competitors.


Leslie, Norm, Randy Paskall, Wayne Yoshizawa, me, & Randy Patton

Practice:

With the exception of Norm and Leslie, the bulk of the team arrived late on Friday the 18th and practice began immediately. With no knowledge of the eventual competition locales, we spent the first full day fishing a stretch of river just above what would eventually be upper venue on the Elk river between Fernie and Sparwood. This piece of water was lovely--a shelf just metres from the shore transitioned first into a deeper pool and eventually into a long slow tailout and back eddy. The cutthroat waited beneath the shelf edge and happily took a variety of dries, nymphs and soft hackles without significantly spooking. Aside from some time working pocket water before we arrived at this spot, most of the first day was spent here. In hindsight this probably wasn't wise, but based on the performance of various flies in this stretch of water we began to form a strategy around techniques and fly types.

The second day was spent at Loon Lake, the venue that would eventually be dropped from the competition. Even before we had arrived this was pegged as the make-or-break venue of the competition, and thanks to Norm's scouting we were armed with knowledge of the lakes two main cold water springs and holding structure. In spite of swirling wind conditions we were able to get a few clean drifts through the holding waters and landed eight fish on the day on a variety of patterns.

Satisfied that Loon was an open book to us we divided our remaining time between the river, which produced fish throughout our practice sessions, and Summit Lake which was for the most part generous to us. I should have been worried when I personally didn't get a strike on Summit, but my teammates' success (particularly Norm Godding's and Randy Paskall's) alleviated any lingering anxiety. In fact I felt comfortable enough to take a little time after the practice sessions to sneak up to Michelle Creek to fish dry flies to the willing cutthroat of that system.

Competition:

For those unfamiliar with the competition format, the events are usually divided into five separate venues. Those venues on streams or shore are in turn broken up into "beats" and assigned randomly among the competitors. In the case of the 2009 Championships there were three river and two lake venues chosen. The three Elk river venues were situated above, in and below the town of Fernie, while the two lake venues took place off the shores of Summit Lake--one on the Southeast shore (Summit 1) and one on the Northwest shore (Summit 2).

Summit 2 Beat 8
The venues weren't chosen to be easy and (as you can see from the picture at right) not for looks either. The two lake venues were shore based and competitors had the option of wading. Essentially the beats (100') were strung along the shoreline and numbered one through nine with the starting beat situated closest to the access points (South in the case of Summit 1 and North in the case of Summit 2).

My first beat was Summit 2, beat 8 and the shot at right was the view looking North. This venue was the replacement for the cancelled session on Loon Lake and in spite of the bleak scree hill pictured, turned out to be a very productive spot owing to the relatively quick drop-off and proximity to the outlet stream at the North end of the lake. Brookies and rainbow were taken in this sector and fishing favoured the morning sessions. Throwing boobies and other floating flies with a sinking line hooked two fish for me, but unfortunately I wasn't able to bring any to hand. Team Mustang faired well on both lake venues, but only Norm Godding was able to land fish for the team on this particular venue, narrowly defeating Todd Oishi from the Cormorants to win his session.

Summit one was a little fairer to the team, with Randy Patton taking his session using a general copper and black pattern, and Wayne Yoshizawa picking up a third place in his session using a black UV bugger.

View From Elk 2 Beat 2 Downstream
I'll be the first to admit I am not the stillwater angler that most of my teammates are, but I was prepared to do better on the river venues, and for the most part I was pleased with my performance. What I was not prepared for, and I suspect the same could be said about all of my teammates, was the water chosen for the beats on the river. On such a beautiful river, with such perfect fishing water, the organizers managed to find some of the most difficult to fish areas I've seen on any river system. Many runs were devoid of structure and those that had it often involved deep fast slots and near impossible to cross sections. I suspect that most of the competitors relished the challenge (I certainly did later), but the initial shock of finding that my first beat was a lousy section of water that I had skipped over during one of the practice sessions was just too much. In spite of literally swimming across the flow at one point to get to fishable water I was not able to bring any of the four fish I hooked to hand and blanked on the session.

I'm sure the majority of the competitors hitting the river on the first day were likewise shocked at the unforgiving water chosen for the competition, except perhaps for those lucky few that had one of the smattering of very productive beats scattered through the competition. If there was one small criticism I would level at the Championship, it would be the inconsistency of the water quality in the river beats, but that's fishing and the luck of the draw.

Deep Wading in Elk 1 Beat 2
I managed to fair much better on my second river beat, drawing a relatively good looking beat in the upper Elk consisting of tailout water at the top end and having a small inflow creek at the bottom. I shared this beat (as well as the last one) with John Nishi, the eventual individual and team gold medallist. This arrangement was the norm in the competition, with two competitors dividing a single beat, fishing half of it in the first ninety minutes and then changing positions for the second 90 minutes. I won the coin toss and fished the better looking upper half of the beat, managing six whitefish and a single cutthroat. I followed this with two cutthroat in the lower section which was enough to secure a first on the session.

Just an aside here on the Elk river whitefish. I was pleasantly surprised at the fighting ability of this little sportsfish and by its bonefish like ability to disappear like a ghost into the watery depths. Even in clearer and slower stretches of water the whitefish were virtually invisible, only betraying their presence when spooked by a clumsy wading angler. They proved to be an excellent competition target due mostly to their relative abundance on the Elk system and their tendency to favour water not normally home to cutthroat--which seemed to describe most of the competition beats.


A Stealthy Approach on Elk 3 Beat 4
I can safely say my final river beat was the toughest of the competition. Elk 3 beat 4 below town, a virtually featureless strip of shallow water, had bested eight anglers prior to our arrival on the final day of competition. Of the eight anglers only one had managed to hook and subsequently lose a single fish. Hopes were less than high going in, but the weather had warmed imperceptibly from the previous day we knew that there was at least one fish in the run. John won the coin toss and was the first to hook a small whitefish just prior to the changeover. He went on to hook a second one before I managed to finally land one. This pattern was repeated once more and we finished three to two, which turned out to be enough to take second and third on the session.

Our team faired well on the river as a whole, but certainly not as well as we would have hoped. Including the one I missed on, we drew a total of five river blanks and this pushed us well down in the standings in spite of session wins by Norm Godding and myself on the river.

Wrap-up:

The 2009 Competition, in spite of a few technical glitches, turned out to be a great contest. The selection of river and lake beats made things tough from the get go, but it bought out the best in many of the competitors. Only the most skillful of anglers could make a silk purse out of a pig's ear, and there was certainly more than a few "pig's ears" in this contest. As a result it was no surprise that some of the big players from last year's competition made their way to the top again. On Team Mustang's part this meant that our most experienced members, Norm Godding and Wayne Yoshizawa, managed to keep the team's fortunes alive.

We will see how things work out for upcoming contests, but the junior members of Team Mustang are already making plans to start working on our various weaknesses in preparation for future Nationals. Unfortunately Norm and Wayne won't have the same luxury, as Norm's strong showing was enough to gain him a position on the next Commonwealth Team heading for Wales in 2010, while Wayne will be joining the team heading to the US Nationals in Pennsylvania later this month. Congratulations to them both!


Sun Over the Elk River Final Day

Thank You's:

I just wanted to offer thanks to all the individuals and groups that made the 2009 National Fly fishing Championships such a success:

  • Kevin McIsaac for organizing the event and herding us every morning through the competition
  • Gord Silverthorne, of the Kootenay Fly Shop for his guidance and time in laying out the river beats
  • Randy Taylor and John Nishi for laying out the Summit Lake venues
  • Randy Taylor for leaving his fishing gear at home
  • All those people that volunteered there time for the event including FFC's Bob and Brandy Sheedy, Neil, Marcell, Jeff, Aaron, et al.
  • The NFFC competitors
  • And most importantly the people of Fernie BC
On a personal note I would also like to thank Wayne Yoshizawa for being such a patient and thoughtful team captain; Norm Godding for being the team anchor and great story teller; Randy Paskall for his ongoing encouragement; Randy Patton for his companionship and his love of flytying; Leslie Godding for being the team cheerleader and social co-ordinator; Deb Paskall for being our all-round support staff (and for rescuing my forgotten gear from the hotel parking lot); John Nishi for providing such stiff competition on our shared river beats; Todd Oishi for his past tutoring; Don Chatwin of Moby Nets; Wei Zhao of Admundson Outdoors; Korker's boots; Roger Baker and Hatch Reels; and finally my darling wife, Sheila who has yet to divorce me over my other mistress (fly fishing).

Results:

The following are unofficial results provided by Todd Oishi of FFC (name placings/fish)

1. John Nishi 10/18
2. Ryan Suffron 14/21
3. Todd Oishi 15/19
4. Philip Short 17/22
5. Byron Shepard 18/23
6. Sorin Comsa 19/16
7. Norm Godding 20/14
8. Chris Pfohl 21/22
9. Robert Stroud 22/26
10. Morgan Thorp 22/12
11. Marius Dumitru 22/14
12. Jason Baxter 23/7
13. Clayton Hobbs 24/19
14. Clint Goyette 24/16
15. Ernie Kalawa 24/10
16. Peter Huyghebaert 25/8
17. Chris Iskiw 25/6
18. Ron Courtoreille 26/8
19. John Bisset 27/15
20. Graham Murfitt 27/5
21. Steve Harris 28/13
22. Derek Nees 29/17
23. Terence Courtoreille 29/8
24. Wayne Yoshizawa 29/8
25. Matthew Sparrow 29/7
26. Jonathan Furigay 30/11
27. Peter J. Morrison 30/11
28. Jason Doucette 30/4
29. Aaron Laing 31/11
30. Matt Majors 31/5
31. Ivo Balinov 33/15
32. Arron Varga 33/8
33. Randy Patton 34/4
34. Colin Dunn 35/3
35. Sunny VanDerKloof 36/3
36. Jim Iredale 37/7
37. JeanFrancois Lavalle 37/5
38. Colette Stroud 37/5
39. Alastair Grogan 37/3
40. Rick Passek 39/1
41. Randy Paskall 42/1
42. Rob Viala 42/1
43. Jeremiah Hamilton 45/1
44. Teri Crutcher 45/0
45. Jeff Weltz 45/0

Team Results:

1. The Cormorants 97/93
2. Team Double Hauls 112/69
3. Trout Rustlers 129/61
4. Team VIP 131/36
5. Team Endiable 145/61
6. Ospreys 146/55
7. Team Mustang 156/38
8. Team Tight Lines 184/32
9. Team Rio West Coast 198/8

A few good memories...

2009/07/30

When is a fly rod not a fly rod?


No this isn't some sort of inscrutable Zen Koan--although it could be. A fly rod is not a fly rod when it's a Japanese rod called a Tenkara.

Modelled after long bamboo fishing poles used over the centuries in Japan, the modern Tenkara rod combines graphite materials in a telescoping rod format. There is no reel or guides, only a tapered line running from the rod tip to the tippet material. In many ways it is similar to pole rods fished the world over for species ranging from carp to bonefish, but this one is designed specifically with fly fishing in mind.

I ordered my first Tenkara rod about a month ago based on some online conversations I had with Mike Conner and CM Stewart. Both sang the praises of these unique rods for wet fly and soft-hackle fishing, but also mentioned Czech nymphing applications. I was intrigued and could immediately see application on my home streams for small trout and coarse fish. I ordered the 12' Ebisu 6:4 rod based on the style of fishing I do and to some extent based on the potential size of fish I would hopefully encounter. This is the mid-range in terms of "weight" offered by the importer, Tenkara USA. The ratio shown indicates the number of stiffer sections (6) and the number of more flexile sections (4), thus the Ebisu in this configuration would approximate a medium fast fly rod.

When I opened the mailing tube (received within days of ordering) and extracted the rod from its short case, I was immediately struck by the quality of manufacture. There were no epoxy drips or bumps in the sections and the attractive green section tops make for a rather modern looking piece of kit. The handle on this rod it the traditional pine as opposed to cork. Smooth and knot free, it sits quite comfortably in the hand. The design of the rod is such the cap at the bottom of the handle opens to allow the user to extract each section for cleaning or replacement. When retracted the business end of the rod is protected by a simple cap. Of all the various components the cap is a weakness in that there is no built in storage for it and it must be carried separate from the rod--I give it about 6 months before I lose it on some outing.

Extended, the rod tops out at the advertised 12'. The final section has a small piece of knotted cord fixed to it, and it is to the cord that the "line" is attached. When I ordered the rod I also picked up the recommended tapered furled line. While I like the way the furled leader turns over, I found that its tendency to coil when breaking off a snag and the subsequent need to carefully stroke the line up to 30 times or more to straighten it was too time consuming--particularly on my heavily canopied, bracken strewn home waters. I've since switched to a 5' tapered poly-tip couple with a 6' length of 8lb co-polymer down to 4' or more of 5x or 6x tippet. While not a very elegant set-up, I've found that it suits both the short flick cast used with this rod and the basic controlled drift presentation. In future I will be experimenting with a few different line and taper combinations to see if shortline modified spey casting is possible.

In my next post on the Tenkara I will be looking at a few of the techniques that can be used with these long rods, and where they work and don't work. In the meantime here is a little preview...


Aaron

2009/07/10

Czech Nymphs

A few czech nymphs I've been working on lately. I'm liking this variation--much slimmer than I'm used to tying. The relative slimness should aid in getting these flies down in our turbulent western streams.

Pink and Crawdad


Cream, Burnt orange, and Black


Amber and Burnt Orange (Golden Stonefly)


Amber and Burnt Orange - Dorsal View


These flies are all tyed in pretty much the same way. The generic pattern is as follows:
  • Hook: Knapek czech nymph #8
  • Bead: Tungsten gold 1/8"
  • Underbody: Flattened lead wire .02" (2 Layers)
  • Rib 1: V-rib small or 3x mono
  • Rib 2: Oval tinsel small
  • Back: Scud back, foil or Thin Skin
  • Body: Dubbing
  • Legs/Thorax: Dubbing

Aaron

2009/07/07

Canadian Arctic Deceiver

For many years I wasn't a big fan of deceivers--I used to think of them simply as overwrought hair wing streamers. However, I've come to realize that the profile is hard to beat when imitating various baitfish and the pattern's simplicity belies some of it's key design features--including the bucktail collar that keeps the tail from fouling around the hook. I first used these for chasing Trevally in Hawaii about four years ago and over the last two seasons for Smallmouth Bass. Recently I've employed them fishing Bull Trout, Cutthroat and (much to my surprise) Rainbow Trout.

I tied this fly up for a recent challenge over on the FlyBC Flytying Forum (see link at right). I called it a Canadian Arctic Deceiver originally, mostly due to the White/Red colour combination and the use of Arctic Fox in the tail assembly. The tail is a departure from the spun saddle feathers used originally by Lefty Krey, but given that I usually tie this in smaller sizes this tail allows for both movement and an appropriate profile.
I generally tye this on longer hook shanks (i.e. Mustad 9671, 9672, etc.) for freshwater and regular shank hooks (i.e. Mustad 34007) for saltwater applications.

Canadian Arctic Deceiver


Recipe:

  • Hook: Mustad 80400 bnl
  • Thread: Red Benecchi 12/0
  • Tail: Cream/white arctic fox tail flanked w/ 2 Chinchilla hackles & 2-4 strands "root beer" midge flash
  • Body: Pearl mylar flat braid (optional)
  • Wing/Collar: Bucktail - grey on top, white on sides and bottom
  • Head: Red tying thread
  • Eyes: Holo stick on mylar (optional)
  • Head Coat: Clear nail varnish or epoxy
Step 1: Tye-in thread base followed by fox along the shank (starting the tail a few eye widths to the rear to leave room for the bucktail collar.


Step 2: Flank tail with two chinchilla hackles per side about the same length as the fox tail.


Step 3: Add 2 strands of midge flash to each side, doubling over to form 4 strands over the tail flanks on each side. Trim to length (leave a bit uneven).


Step 4: Tye-in body material and wrap forward to cover body stopping well back from the eye.


Step 5: Add "wing" of grey bucktail (or olive). It helps to trim the butts of the hair at a forward angle to help shape the head.


Step 6: Tye-in the remaining bucktail in three bunches (one per side and one on the bottom) and finish the head.


Step 7: Clean up any loose fibres and apply eyes if using. Add several layers of nail varnish or epoxy.


fin

2009/03/16

Thread & Floss Keeper

Tired of losing chunks of valuable tinsels and flosses every time you put them away? Annoyed when that expensive and perfectly spooled wire slips from your grasp and unravels? Well, have I got the solution for you... Child's hair elastics.

Okay. So it doesn't sound earth shattering, but this tip can actually save you time and money, as well as protect delicate silks and flosses.

Very inexpensive, small cloth hair elastics can be purchased at almost any dollar store. Looped around the spool, they secure the material without causing damage - unlike the plastic Cerlox tabs you may have seen elsewhere. Because they are generally synthetic there is also little chance of colour transfer. Larger elastics can be used, but they may have to be doubled up for smaller spools.


Aaron

2009/03/10

DIY Bodkin/Dubbing Brush


This is a little trick I came up with some time ago--a combination dubbing brush and bodkin needle. It slims down the tool kit just a little and makes a useful addition to your arsenal.

Materials:
  • 1/4"-3/8" Doweling
  • Drill fitted with a fine gauge drill bit
  • 3/8"-1/2" strip of small loop Velcro with glue backing
  • Heavy gauge needle
  • Epoxy
  • Fly tying thread
  • Super glue (optional)
Instuctions:
  1. Cut the doweling to an appropriate length (5-6" or so)
  2. Drill a hole in one end about 3/8" deep
  3. Affix the Velcro to the doweling at the drilled end either using the sticky backing or superglue to temporarily adhere it
  4. Make a couple of wraps over the velcro at either end using the thread, whip finishing both to secure the Velcro to the dowel
  5. Brush the bottom end of the needle with super glue if using
  6. Place the needle in the pre-drilled hole
  7. Place a good drop of epoxy at the base of the needle and let dry


2009/03/08

2009 Fraser Valley Boat & Sportmen's Show (Recap)

Well, as they say... the best laid plans. In spite of my best intentions I was not able to post a review of the show on the weekend, but here's a quick recap and a few pictures from the Sportsman's show.

The show venue was the Tradex facility immediately adjacent to the Abbotsford Airport. While small compared to shows in other parts of North America, it still attracted 162 exhibitors ranging from small specialty manufacturers to towns! The event was quite well attended by the public, with the largest crush of people showing up between opening and about 4pm on Saturday.

From my location at the Amundson rod booth I was able to talk to plenty of John Q Public and renew acquaintances that I had not seen since the last show including Don Chatwin of Moby Nets. While I wasn't able to spend as much time as I would have liked exploring the booths, I did get a chance to look at the new Dave Scadden "V" shaped pontoons, press a few buttons on the new Hummingbird sounders, stop by the Sage rod booth to chat with Todd Oishi, and talk with Rick Passek about his new book.

While attendance was probably down a bit from last year it was great to see such enthusiasm in fishing and outdoor activities in general.

Below are a few shots from the show. I'll get back to the business of discussing fly fishing and tying in my next post, but for now these will have to do.

Aaron

PS A big hand a thanks to Wei Zhang, the president of Amundson Outdoors for several of the photos below.

Angler's Alley

Camping and Lodge Areas

Amundson's Army (Pro-Staff)

Brian Chan stops for a chat (photo Wei Zhang)

Wei Zhang - President of Amundson Outdoors

Don Chatwin from Moby Nets

Rick Passek

Rick's New Book - The Freshman Flyfisher's Insect Guide

Jim and Patty from the BC Wildlife Federation

Pacific Angler Booth

2009/03/05

2009 Fraser Valley Boat & Sportmen's Show

No article today, just a reminder to all local readers that this weekend, March 6th to 8th, is the Fraser Valley Boat & Sportmen's Show. This is our one big "local" event of the year, and this time I will be helping out at the Amundson Products booth (#'s 374-376) right between Riverside Fly and Tackle and Galilee Fly and Tackle in Angler's Alley.

I will be there from 1pm-8pm on the Saturday and from 10am to 1pm on Sunday. If you are planning to attend, come on down and say hello. While you're there be sure and check out Amundson's 2009 Wind Warrior rod line-up.

I'll bring my camera and post a quick review of the show hopefully for Sunday morning.

Aaron

Improved Trilene Knot (step-by-step)

There are plenty of knot sites on the web these days, and Killroy's, Orvis & Knots by Grog are some of the good ones I've visited recently. While these sites contain most of the common knots, the one illustrated below is one that I have yet to come across. I do not claim any creative rights to this knot, but it's not widely known about. Since stumbling across it some time ago I've use it with mono, fluorocarbon and copolymer tippets and to date it has been by far the strongest and most stable knot I've used.

I came on this fly after reading about the Trilene Knot and reports on that knot's relative strength (approaching 100%). The only reported problem with the Trilene Knot is that it had the tendency to loosen and slip unless the tag was kept long. The simple solution (liked the improved clinch) was to tuck the tag back through the larger loop. Both knots probably owe their strength to the double pass through the hook eye as this spreads the pull load across a wider surface area.

Before we get to the photos, I want to clear up some knot terminology for the beginner. A "tag" is the cut end of the rope or fishing line, while the "standing" line or end is the uncut portion. Line-to-line knots will almost always have two tags and two standing lines, but this knot uses only a single line with one tag and one standing end. Clear as mud? Then let's get started...

Step 1: Components. I'm using a nylon cord in place of the tippet or leader, and a brass drawer pull in place of a hook eye.


Step 2: Thread the tippet through the eye initially leaving a tag of about 7-10cm.


Step 3: Pass the tag again through the eye leaving a loose lower loop.


Step 4: Wrap the tag around the standing line between three and six times. For heavy tippet material (12lb+) fewer wraps and for lighter material more. Too many wraps with the heavy material will leave a massive knot and there doesn't seem to be any noticable strength loss with the lower number of wraps.


Step 5: Pass the tag back through the lower loop you created in step 3 above. If we tightened the knot at this point we would have a Trilene knot, but there is an additional step (#6) which increases the knots stability.


Step 6: Pass the tag back through back through the upper loop.


Step 7: Now the only tricky part. Lubricate the knot with saliva (or water). Tighten by first pinching the knot and pulling gently on the standing end to snug the knot against the eye. Finish tightening by pulling on the tag, hook and standing line simultaneously.


Step 8: Trim the tag end leaving a very small nub of a tag (just to be on the safe side).